by Jing-fan Zhang, Director of Business Development, Synopsys Inc.
Introduction
Integrating PCI Express into a design requires verifying that the product is compliant to the PCI Express specification and interoperable with other PCI Express devices. To lower integration risk and improve overall design quality, it is required to think about compliance and interoperability during verification, hardware testing, and PCI-SIG compliance testing.
This article discusses the road to achieving compliance and the role that Synopsys DesignWare Intellectual Property (IP) for PCI Express can play in helping to achieve interoperability and compliance. It also covers testing of the product at the PCI-SIG Compliance workshops and the use of the Protocol Test Card.
Commercial IP Saves Time for Compliance Certification
Before starting a design, you need to determine the type of PCI Express interface that is required. Is it a Root Complex, Endpoint, Switch or Bridge device? Then you have to decide whether to make or buy the PCI Express interface IP. Buying a proven IP solution will help speed the compliance process, if your vendor has already taken their IP through compliance testing. Finally, on the way to creating your final product, you have to integrate the IP into your application, verify the whole design with simulation, and possibly create an FPGA prototype.
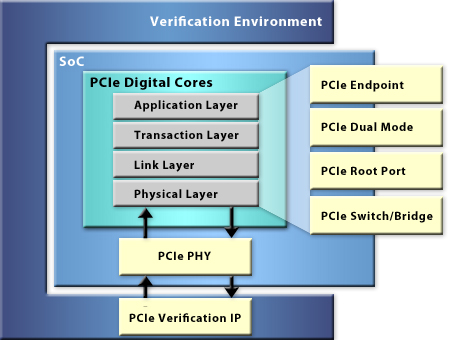
Proven, certified PCI Express IP solutions can smooth compliance certification and interoperability for your products. An IP provider that offers a complete PCI Express IP solution for the PHY, digital controller and verification IP will give you all the pieces you need to incorporate PCI Express into your design. By using a single supplier for your PCI Express needs, you reduce the risk of all of these components not working together allowing you to deliver your product to the market faster (Figure 1). We will now go through the steps for selecting a PHY, digital controller, and verification IP for your PCI Express design.Selecting a PHY for your PCI Express Design
Selecting a PHY for your PCI Express Design
When deciding whether to build or buy the Physical Layer (PHY), it is important to take into consideration the following guidelines:
- Choose a PHY that has a small die area, low power, low jitter and excellent receive sensitivity, which gives you the most optimum Bit Error Rate (BER).
- Look for a flexible architecture, especially if it will be reused in more than one design. It is likely going to change the number of lanes depending on the application.
- Find one that yields well and is reliable because that lower your cost.
- PCI Express Gen 2 is now being adopted, so you might want to look at a PHY that can run at Gen2 speeds.
- It will need to interface to the link layer (PIPE is the standard way).
- You should choose a PHY that has already passed the compliance tests.
Figure 2 below shows the receive mask margin, and Figure 3 shows the receive sensitivity margin of the DesignWare IP.

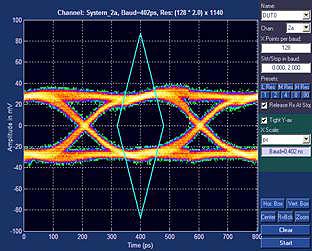
Figure 3: PCI Express Rx Sensitivity Margin
Guaranteed compliance and interoperability in manufacturing are always key concerns. Traditional testing techniques for analog PHYs rely on the relatively simple concept of “external loop back†testing, which consists of sending out a known pattern through the PHY and receiving it back for a comparison. This is a simple go/no-go test that will tell you whether or not the PHY passes but it WILL NOT tell you how much margin you have. The risk with this approach is that chips that pass the loop back test that are marginal may fail over time when subjected to real world conditions. So the question is, "How do you know what the eye openings are without requiring high-speed testers and equipment?"
You should look for a PHY, which includes an on-chip debug. Using a PHY with built-in debug and diagnostic capabilities will provide:
- Visibility into the actual link performance, which is superior to loop back.
- A cost-effective view into the performance of your PCI Express and PHY interface by being able to directly measure jitter and voltage margin.
With these capabilities, you can quickly debug signal integrity issues, resolve them, and have a fast ramp time to production. These diagnostics will also enable you to implement a more thorough testing methodology than a simple go/no-go loop back test.
Choosing Digital IP for your PCI Express Design
A complete PCI Express IP solution should include a family of digital IP controllers that are designed to the latest PCI Express and PIPE interface specifications. With PCI Express, one IP block is not going to be able to satisfy all of the different requirements, so choose a vendor that provides a portfolio of cores that supports each of the port types and multiple data path widths.
- Architecture optimized for lower gate count and latency
- Configurable to support for x1, x4, x8 and x16
- Endpoint, Root Complex, Dual Mode (RC/EP) and Switch/Bridge
- Optimized data path at 32, 64, 128 bits (avoid parameterized data paths)
- FPGA support at 125 MHz
By providing multiple options, you can select the digital IP core that best suites the needs of your design.
To ease your way through PCI-SIG compliance and interoperability, the IP cores from the vendor should have already been tested for compliance at the PCI-SIG workshops and a number of 3rd party PHYs and Verification IP.
The Synopsys IP for PCI Express is tested in a number of different ways. One is a Verilog Test Environment built with the Intel Bus Functional Model (BFM). The Intel BFM is used for some legacy reasons, but is not the only verification IP that is used to test the core. The verification environment built using the Intel BFM is completely self checking and supports directed and random testing. Synopsys also has a number of assertions based on the PCI Express specification that is used to check the core against the compliance checklist.
The PCI Express IP is also tested with a second verification environment built on the DesignWare® Verification IP (VIP) for PCI Express. This environment supports directed and random testing. Using Verification IP to test the product improves interoperability and improves your confidence that the IP is thoroughly tested.
The PCI Express IP digital cores are tested using the latest test methodologies including directed and random simulations and assertions. A number of interoperability tests are done by attending the PCI-SIG compliance workshops, using the Protocol Test Card, participating at Intel plug fests, and conducting interoperability testing using third-party PHYs and VIP. The IP is also put into silicon and FPGAs. But in the end, the best measure of compliance and interoperability is the number of successful tape-outs and products that are shipping using the IP.
Choosing Verification IP for your PCI Express Design
In the same way that using a commercial IP core is critical to meet time-to-market goals, using commercial VIP is critical to meeting verification schedules. One big advantage of using a commercial IP core is that verification has already been completed by the core supplier as part of achieving compliance, thus significantly reducing the overall verification effort for the project. The verification task can now focus on using the Verification IP to apply application-specific tests and scenarios so that the traffic at the interface mimics the traffic that will be seen by the end product. It is valuable to use a constrained random methodology to test for corner case behaviors, and random error injection to test for real world activity at the interface. All of these help to uncover anomalies with system integration.
The example (Figure 4) shows a single instance of the PCIe verification IP, but multiple verification IP components may be needed to generate traffic on the other interfaces in the design to verify that all of the blocks in the design are communicating with each other correctly. Pre-canned directed test suites are primarily suited for standalone core verification and follow a predetermined set of tests, driving behavior on both sides of the core to provide coverage of the PCIe compliance checklist. They don’t help significantly with system integration where much of the behavior is driven by the system. It requires a great deal of effort to make the system behavior follow the sequence of tests required by the test suite. The tests that come with the core certainly do not help with random traffic generation and the error injection needed to catch corner case problems associated with system integration.

Also, if the test suite comes from a different source than the core provider, assertions that track behavior inside the core need to be re-written to deliver the information needed by the test suite. More importantly, the behavior is generic and not targeted towards the application. A more useful testbench delivers application relevant traffic, as in the case of a graphics controller receiving video frames that tests the behavior of the overall system.
The main verification challenge at this stage is verifying the PCIe core integrates into the system without any anomalies. The DesignWare Verification IP allows easy creation of directed and random traffic that can be constrained to deliver application relevant traffic. This of course includes generating the traffic to test essentials like power management, link training, and various parts of the system. Error insertion and checking are essential to verify that the system correctly handles error conditions.
The transactor model, available in the DesignWare Verification IP, is used to generate PCIe traffic and flag any protocol violations. The monitor tracks and logs traffic on the interface and generates functional coverage reports and compliance checklist coverage reports. These features allow you to rapidly create testbenches targeted at testing the DesignWare IP core integrated with your application, as shown in Figure 5.Overall productivity also depends on choosing verification IP from a vendor with a proven track record in developing and supporting verification IP, and with a comprehensive testing process for ensuring correct behavior and consistency across tool releases.

The DesignWare Verification IP comes with comprehensive examples to showing usage for all the functions and a full system example that can be easily reconfigured to the application and begin generating traffic. Synopsys provides all of this capability to help you with the verification of the core and PHY in the system.
The Verification IP performs all of the functions necessary to verify the PCI Express Root Complex, Endpoint and Switch. It fully supports the protocol essentials like power management and link training. Packets can be passed into the Transaction or Data Link layers and the Verification IP then generates PCI Express traffic at the interface. When used with the reference verification methodology (RVM) for coverage-driven constrained random verification, the RVM generator (included with the VIP) can be used to generate random traffic based on valid defaults in the VIP or constraints provided by the user.
Synopsys Compliance Board
When setting out to achieve compliance and test interoperability for the DesignWare IP for PCI Express, the following goals were in mind:
- Be able to test multiple IP configurations
- Run at full speed in an FPGA
- Be able to prove interoperability with third-party PHYs
- Test for interoperability with the PCI Express PHY from Synopsys
- Interoperate with other PCI Express platforms/products
- Have an application that could be use to go through the PCI-SIG compliance workshops
- Be able to be use the hardware to demo the PCI Express IP cores

Figure 6 shows the Synopsys compliance board block diagram. The figure at the top is the Synopsys Ethernet add-in card. The large square is the FPGA that houses the DesignWare Digital Core for PCI Express. The figure on the bottom is the PHY daughter card. The two boards can be connected together via the connectors, which are the long gray rectangles on both of the cards. Figure 7 shows pictures of the actual boards. In the upper left hand corner is a picture of the add-in card for testing the PCI Express Digital IP. The picture in the lower left hand corner is the PCI Express PHY test card. The picture on the right shows the two boards coupled together running with the Agilent PTC card in a PC based on the Intel 915 chip set, which supports PCI Express.

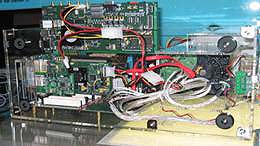
Figure 7b: PCI Express Card Plugged Into PCI Express-based PC
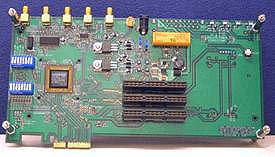
Figure 7c: Synopsys PHY Daughter Card
Figure 7: DesignWare PCIe HW Verification Certification and PHY Interoperability Board
To ensure interoperability between our digital controller and 3rd party PHYs, Synopsys has done extensive testing with multiple PHY vendors and was the first IP to be on the PCI-SIG Integrator’s list.
Testing with the Protocol Test Card (PTC) from Agilent
One of the ways the PCI-SIG promotes adoption is by holding plug fests or compliance workshops each quarter. These plug-fests enable systems to be testing together to validate interoperability and compliance for each vendor. Agilent partnered with Intel and the PCI-SIG to supply the Protocol Test Card, which contains Synopsys DesignWare IP.
To get on the PCI-SIG integrators list, the PCI-SIG requires that a company’s entry passes several compliance tests. The E2969A PCI Express Protocol Test Card (PTC) provides the protocol tests. The PTC is seen from the PCI-SIG committee as the golden device to test PCI Express compliance. Every Plug fest uses the PTC and the tests developed for the PTC to check the compliance of participating devices.Protocol Test Card Benefits:
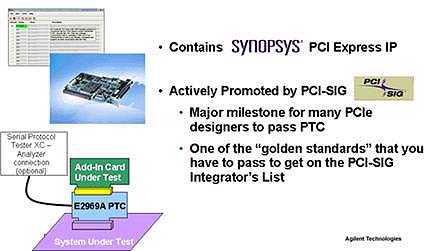
Figure 8: E2969A Protocol Test Card PCIe Compliance Test (Courtesy Agilent)
- Cost-effective compliance solution
- Push-button solution
- Easy-to-use
- Pre-programmed tests
- Improves the design quality of products and accelerates time to market
- Allows x1, x4, x8 & x16 cards to be plugged in
- Pass/Fail Report
Protocol Test Card Test Methods:
-
Add-In Card Test Mode
- Test Card monitors downstream device behavior
- Downstream TLP Error injection
- Downstream traffic injection/capture through USB port
-
Platform Test Mode
- Card appears as simple endpoint
- Most aspects of endpoint behavior can be controlled
-
Topology Simulation Mode
- Host system configuration queries routed through Test Card
- USB port to remote system
- Remote system provides configuration responses to host system via Test Card
PCI-SIG Compliance & Interoperability
So what does it take to pass compliance at the PCI-SIG workshops? The PCI-SIG compliance program is focused on interoperability of PCI Express devices. These devices must pass the compliance tests to be listed on the PCI-SIGs Integrator’s list. By meeting all of the criteria laid out in the compliance program, designers can avoid subtle interoperability issues. To be clear, the PCI Express compliance is NOT a logo certification program. By passing all of the tests and meeting the criteria, your product will be listed on the PCI-SIG’s Integrator’s List for PCI Express.
The Compliance program consists of three main areas:
- The first is defined in the compliance checklists, which have a number of tests that you have to meet. These checklists mostly contain tests that you have to perform on your device during your verification process.
- The second is the compliance and integration tests. These are the tests that you will run at the PCI-SIG compliance workshops and include test tools and procedures that are run on your device.
- The third is clearly defined pass and fail criteria. You have to pass all of the “golden tests†and be able to interoperate with over 80% of the systems that you test with.
With all of the different types of systems that can contain PCI Express interfaces, the PCI-SIG faced a number of challenges when trying to determine how to test for compliance and interoperability with multiple devices. The SIG had to deal with different types of systems, add-in cards, multiple lane widths and multiple operating systems and yet come up with a standard set of tests to ensure compliance.
The compliance and integration tests are broken up into the test specifications and the test procedures. The test specifications define what has to be tested and what the test will check. The test procedures define how the test is run, the equipment setup, and detailed step by step instructions. By following the test procedures, the PCI-SIG is ensuring repeatability between your lab and the compliance workshops.
PCI-SIG PCI Express Compliance Tests cover the following:
- Physical layer
- Check electrical, i.e., signal quality, jitter - Configuration space
- Verify required fields and values - Link and transaction layer
- Exercise protocol boundary conditions
- Inject errors and check error handling - Platform configuration
- Check BIOS handling of PCI Express devices
The electrical tests and tools test the signal quality and perform jitter analysis. You can see the list of the many things that are tested here including things like the eye pattern, jitter and bit rate analysis, etc.
Electrical Tests & Tools
- Signal Quality Analysis H/W and S/W
- Eye pattern, jitter and bit rate analysis
- Upstream and downstream signaling
- Electrical compliance base board
- Electrical compliance load board
- Stand-alone Windows-based eye diagram analysis S/W
- Electrical test procedures and oscilloscope setup files
- Jitter Analysis DLL
- Clock recovery
- Interpolation
- Transition/non-transition eye points
- Goal - Promote consistent solutions
There are a number of electrical tests that are performed. These include testing of the PHYs, tests on the motherboards, the reference clock, adapter cards and ensure that you have a clean clock.
- PHY testing
- Motherboard electrical tests
- Tests Root Complex electrical signal quality
- Tested using the Compliance Load Board (CLB)*
- Reference clock jitter testing
- Tested by using the CLB
- Adapter electrical tests
- Test add-in cards with Compliance Base Board (CBB)*
- Clean clock testing
- CBB has very low jitter to allow accurate measurement of device under test’s jitter
The PTC is used to perform protocol testing on link and transaction layers and has the ability to inject errors to check error handling.In the PTC card shown in Figure 9, you can see the x16 connector at the top, which accommodates up to 16 lanes. Even though you can plug in a device with 16 lanes, for testing the protocol, you only need to test a single lane, so only a single lane is used to perform the tests.

During the link testing, the following tests are run using the PTC card. You must pass all of these tests to be listed on the integrator’s list:
Link Tests:
- Reserved fields – Device ignores them
- NAK response – Device will resend after receiving NAK
- Replay Timers – Device will resend packet if no response
- Replay Count - Device will resend multiple times when no response
- Link Retrain - Device will retrain if continued no response
- Replay TLP order – Device replays TLPs in proper order
- Bad CRC - Device detects, drops, and logs (DLLPs & TLPs)
- Undefined packet – Device ignores
- Bad Sequence Number – Device detects, drops, and logs
- Duplicate TLP - Device returns data once
To test the replay timer, you must first initialize the device under test and enter the standard operating mode of the device. Once this is complete, the test sequence shown here is performed on the device under test.
Link Replay Timer Test
- Initialize DUT and enter standard operation
- Test sequence o Host does Config_Rd_Req to device o PTC blocks Config_Rd_Completion from device o PTC verifies that device ‘replays’ completion
Testing the transaction layer is more difficult because it is closer to the actual application. The SIG continues to provide transaction layer testing in the areas of basic functional tests, baseline messaging, flow control and virtual channels. Check the PCI-SIG web site for specifics on the tests and their availability.
- Basic Functional
- Completion request
- Completion timeout
- Read data
- Baseline Messaging
- Legacy interrupts
- Native power management
- Native hot plug
- Error signaling
- Flow Control
- Initialization
- Transmit and receive states
- Negotiated link width
- Virtual Channel
There is a software program called PCIECV that is used to test the configuration space. The tool checks registers and the capabilities, performs functional stress tests, and basic system tests. In the tests, the tool checks the product to make sure the specifications are covered for PCI Express 1.0a, PCI capabilities, power management, etc.
- Checks registers and capabilities
- Required registers and capabilities
- Default values
- Characteristics
- Specifications covered by the tests
- 1.0a PCI Express, 1.1 PCI Express, PCI 2.3/3.0, PCI Express Bridge, PCI Power Management
- Functional
- Configuration stress test
- System
- Slot reporting
- Basic hot plug event reporting
For testing the configuration (Figure 10), you will be either testing a system or an add-in card. You will need to have a compliant add-in card to test a system or a compliant system to test an add-in card.
Testing a System

Add-in Card

In order to go to the PCI-SIG compliance workshop and test your device, you have to have your device on either a motherboard or on an add-in card. All PHYs have to be tested as part of an application.
The three areas that need to be passed in order to get on the integrator’s list:
- Compliance testing. These are the gold tests that you have to pass and include the electrical tests, the PTC and the configuration tests.
- You have to demonstrate interoperability with over 80% of the systems during the PCI-SIG compliance testing
- You have to make sure that you can show that you pass all of the items on the compliance checklist for the device that is appropriate for your system.
When all of the criteria are passed, you then apply to the PCI-SIG with the necessary materials. Once this has been accepted, the PCI-SIG will list your company on the Integrator’s List.
Summary
The DesignWare IP for PCI Express is the industry reference standard and provides designers with a complete IP solution that has gone through extensive 3rd party PHY, verification IP and hardware testing to ensure interoperability and compliance, enabling you to speed through the compliance testing of your device. By using a proven path you will lower your risk and improve the quality of your design.
For more information on DesignWare IP, please visit www.synopsys.com/designware
