By Bhumi Shah, eInfochips
Unit testing is a technique of breaking the code in small units of the entire code. These units can be verified to check the behaviour of a specific aspect of the software. One of the major challenges involved in unit testing of embedded software is that the code interacts with the hardware peripherals. In mostcases, hardware cannot be accessed during unit tests. Keeping hardware interaction as thin as possible helps in testing most of the code by dividing it into small pieces. These pieces can then be independently tested without hardware interaction.
Ceedling[1] is one of the best automation frameworks available for Embedded C software unit testing. It works as a build system and provides functionality to mock source code and execute tests. Ceedling build system is made up of Rakefiles in Ruby language, which is similar to Makefiles. Ceedling contains three main utilities (Unity, CMock and CException), which individually contribute to Ceedling functionality.
Unity (Unit Test Environment) is a test framework written in C language. It contains a single source file, two header files and helper tools to generate test runners (Auto generated test files for each test). Unity provides different assertion statements to verify tests for datatypes and its attributes, such as bit-size, hex-value, signed-unsigned types, pointers, memory assertions and many more.[5][3]
CMock[2] is a tool to generate mock functions from C source header files. It generates mocks for each function and puts these into new mock files that aregenerated at run-time. It takes the provided CMock configurations into project configuration file (project.yml) and source header files. Based on both of these it generates five different types of mock functions for each functions of the module. These five mock functions are (Expect, Array, Callback, Cexception and Ignore). Below are the samples of the mock functions.
void DoesSomething_ExpectAndReturn(int a, int b, int toReturn);
void DoesSomething_ExpectAndThrow(int a, int b, EXCEPTION_T error);
void DoesSomething_StubWithCallback(CMOCK_DoesSomething_CALLBACK YourCallback);
void DoesSomething_IgnoreAndReturn(int toReturn);
These mock functions are generated at runtime into runner files and can be used to unit test different scenarios as suggested by the function name(e,g,:, ExpectAndReturn can be used to check return value of the functions, ExpectAndThrow can be used to check the exception from the function and so on. Mostly the syntax for mock functions follows as:
Return_Type SourceFunctionName_MockFuntionality(args);
These mock files are compiled and linked along with test module code.
CException is an exception library, which provides exception-handling functionalities.
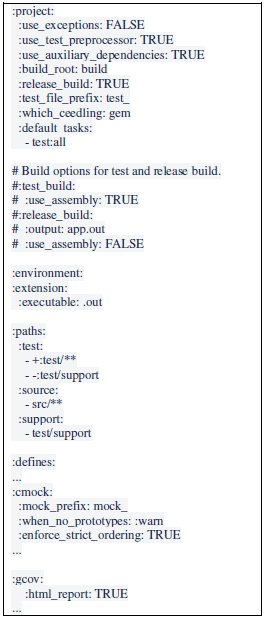
Directory structure of a ceedling project contains source, test, and build directories along with a top-level configuration file (project.yml). This configuration file contains tags and field values for paths, environments, libraries, CMock, Project and many more required/optional settings. For reference, please see the Project.yml. This file is auto-generated at the time of project creation and requires further updation as per project configurations
Project.yml:
Unit Test Code Format:
Ceedling defines a specified format for parsing and execution of test code. It contains header files (framework, mock module, and source headers), setUp and tearDown functions along with test functions. setUp function is called at the start of each test whereas, tearDown function is called at the end of each test.
To identify test code and source code files, Ceedling framework uses “test_file_prefix” attribute defined in project.yml file. All test code files must start with “test_file_prefix”.
e.g. in the project.yml file above, the “test_file_prefix” is defined with “_test“, hence each test code files in this project must start with “_test“.
Figure1 defines the unit test example file. It has included “unity.h(Unity framework) and “mock_bar.h”(Mocked functions) file. Here inclusion of “mock_bar.h” says that the “bar.h” is the source file and it needs to be mocked for testing. Now, CMock searches for the “bar.h” file in the source code directory. On locating the file, CMockgenerates “mock_bar.h” file with mock functions for each of the function available in the header file. It also creates runner files and puts these into the build directory with test_<testfilename>_runner.c containing the main function and other CMock, unity functions.

Figure 1: Unit Test Code Template
Ceedling also provides functionality to generate the source coverage report. It requires the gcov and gvcovr module package to do this. These modules need to be configured into the Project.yml file to generate a report in HTML or XML file format. This helps in discovering any dead code or source code, which is not tested.
Step-By-Step guide to using Ceedling:
- Install Ceedling[6] along with Ruby and MinGW on to the test machine.
- Create the Ceedling framework with new a project or with an existing project using ceedling new <projectname>.
- Configure the project.yml file with required environment inputs, paths, CMOCK options, and libraries to be used.
- Make sure all source files are available in the source directory defined in project.yml.
- Write the unit test code based on the template in Figure 1 for the source module functionality under test. Make sure to include all required header files (unity, mock headers).
- Once the unit test is created, use the command: Ceedling : test all to build and execute all unit tests (Individual module test can be executed with: ceedling: test <modulename>).
- At the start of the build process, Ceedling reads the header file functions and generates the mock header files.
- The mock files are generated under the build directory with the same name as the source filename with mock_ prepended. e.g. For “display.h” the mock file generated will be named as “mock_display.h”
- Ceedling links the related source and test files, and creates an output (.out) file.
- It executes the unit test and compares the expected results based on the assertion functions used.
- Finally, it displays the test summary on screen.
Examples:
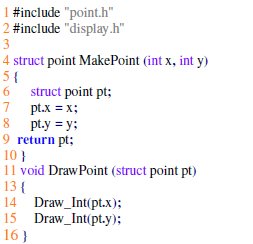
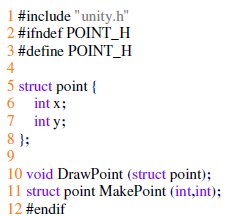
This is a basic demo application composed and unit testing has been performed using Ceedling. The source files appear below:
Point.c
Display.c

Point.h
Display.h

This contains two source modules point and display, where point module uses the functionality of the display module by calling its function. As shown in point.c, it contains two source code functions MakePoint()and DrawPoint().
Here MakePoint() assigns the argument values to the structure variable whereas DrawPoint() calls the Draw_Int() function of the display module which is into display.c file. point.h and display.h header files contains the definitions for the source functions.
Now, Let’s write a code to test MakePoint() and DrawPoint() point module functionality.
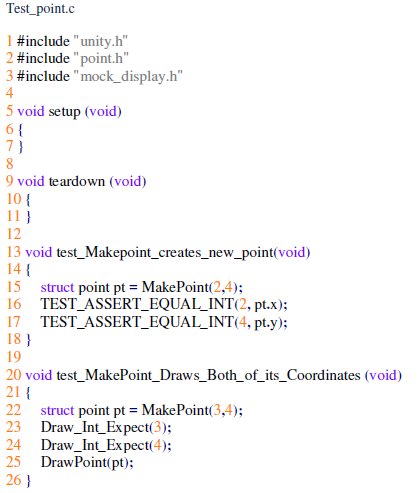
The unit test code above is written to test the Point module functionality. The display module is mocked to test point module functionality, hence “point.h” and “mock_display.h” have been included.
This test code does not require any initialization/de-initialization so the setUp and TearDown functions are empty. There are two test functions written to unit test code.
test_Makepoint_creates_new_point( ) uses the unity assertion functions to check that the Makepoint() is called with integer values and that correct values are assigned to the structure variables. Here it calls the MakePoint(2,5) as known inputs at line 15 of Test_point.c file. As shown in point.c line 6-8, structure pt’s variables are assigned with input values provided. Now when it checks for pt’s x and y variables values at lines 16-17 (test_point.c), the test is passed..
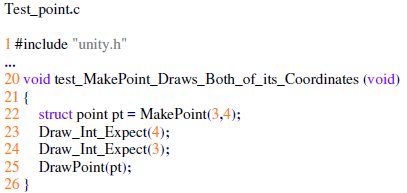
Another test function test_MakePoint_Draws_Both_of_its_Coordinates() is created to test that the DrawPoint() function calls the Draw_Int() function from the display unit with expected values. This function calls the MakePoint() function with known values (3,4) and calls DrawPoint() function with structure pt.
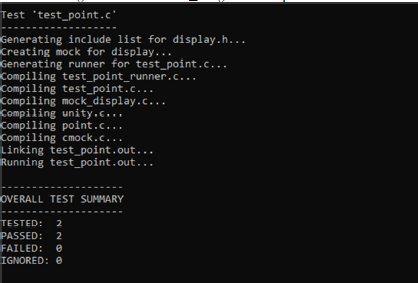
To test the functionality that DrawPoint(pt) calls the Draw_Int() with x and y value, unity assertion Expect is used as shown in line 23-24 of Test_point.c. As seen in point.c line 12, DrawPoint() calls the Draw_Int() function from display.c with structure variable as the argument. This test will pass as DrawPoint() calls the Draw_Int() with expected values. The result window will be as shown below:
Now let us change the unit test code for the point module to see the behaviour of the test framework and its results. This test (given below) is used to check the sequence of the DrawInt() calls.
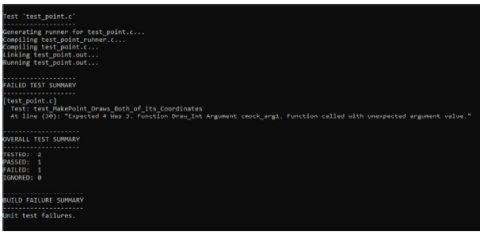
As shown in the test, test_point.c is changed and Draw_Int_Expect() values have been changed to 4 and 3 instead of 3 and 4 at line 23-24. As per source code implementation of DrawPoint(), it calls Draw_Int() with x value first and then y value. This fails the unit test by saying that the expected and actual values do not match.
Result:

Now, Let’s take a case where DrawPoint() is not called as shown in the unit code snippet below. In this case, Draw_Int() is been expected to be called twice but it will not be called and thus the unit test will fail. Refer to the snapshot below for the error message.

Result:
Considerations/Limitations:
Here is a list of considerations/limitations to keep in mind while working with Ceedling.
- Source files and header files name should be same throughout project to use this framework. (e.g. point.c should have point.h)
- All unit test code filenames should start with test_prefix defined into project.yml file.
- Ceedling follows the incremental build concept for the unit test code build. It builds all unit test code files for the first time and generates test runner files for each test case. It then builds only modified unit test files from the next build cycle.
- The source files available in the project should match with the extension defined in configuration file. Ceedling cannot understand source files with any other extension for that project. e.g. if project.yml has defined source file extesnsion as “.c” , then it will not consider “.cpp” files as part of project source code.
- CMock identifies structures by comparing the memory byte-by-byte when the structure is not packed. It fails the data comparison of the structure elements. Solution: pack structure if possible using -fpack-struct as an option for GCC, which will force the structure to be packed. TEST macro can be used in source code to pack this structure while using test build if one does not want to pack in the release build
- CMock ignores inline functions by default, if CMOCK creates the mock of the inline function, the compiler will not be able to decide which function to use.
Solution: Wrap the definition into a macro and define a function that can be utilized during the test. - As the Ceedling unit test environment is developed for the test machine, GCC will be used as the tool-chain, while for embedded boards, platform specific toolchains should be used. There may be some instructions that are not available in the GCC toolchain. This can cause an issue while executing the unit test. [e.g, “rev” instruction is used to reverse the byte order of word in ARM instruction set but it is not available in GCC toolchain.]
Solution : Replace the instruction with piece of code that provides the same behaviour as the instruction and put this into the TEST macro. Alternatively, stub the function having such instructions and return the expected value. - Since Ceedling can be used with Desktop test PC Environment or Emulators, but not be used with actual target hardware, testing the hardware interacting code is not possible using ceedling. Unit testing of the Application, Drivers and HAL layer can be done using ceedling.
Solution: There are alternate ways for some of the code functionality testing. For instance, if we have a source to get the value of SFR in Microcontroller, it can be tested by writing a unit test that allocates memory and writes register values into that memory from mock functions instead of registers. This helps conduct unit testing for some of the hardware interactive code.
Hope you find this article helpful in setting up a unit testing environment using Ceedling, while creating Embedded C software/firmware programming. Happy bug free coding.
References
- http://www.throwtheswitch.org/ceedling
- http://www.throwtheswitch.org/cmock
- http://www.throwtheswitch.org/unity
- http://www.throwtheswitch.org/cexception
- https://github.com/ThrowTheSwitch/Unity/blob/master/docs/UnityAssertionsCheatSheetSuitableforPrintingandPossiblyFraming.pdf
- https://static1.squarespace.com/static/549f45d6e4b037c1971053fd/t/5a5914d39140b75f8713debf/1515787476452/installation-guide-windows.pdf
